Guide to producing and displaying videos
This guide covers the complete process of creating and playing your own 360° videos to project them using Broomx immersive projection systems. It is designed for beginners and does not require any prior technical knowledge. The 360° videos you produce will later be played through the Broomx immersive projector using a USB flash drive to ensure content privacy and easy management.
This guide will walk you through the process of recording with an Insta360 camera, editing your videos, exporting them properly, and uploading them.
If you have any questions or need assistance, feel free to contact our support team at support@broomx.com.
Overview
360º Camera Model
To start recording your own 360º videos, you will first need a 360º camera.
This guide refers to the following models:
-
Insta360 X3
-
Insta360 X4
-
Insta360 X5
All of these models are available as accessories that can be added to your order of MK1 and MK2 immersive projectors.
Other brands and models of 360º cameras may be compatible with the required media specifications (see below), but Broomx cannot offer guarantees or provide technical support for them.
What You’ll Need
-
Insta360 camera
-
microSD memory card: Speed Class 3, Video Speed Class 30, Class 10. An example would be a SanDisk Extreme PRO.
-
microSD memory card reader for your computer
-
Insta360 invisible selfie stick or tripod (optional)
-
Lens wipes or lens cleaning cloth
-
Computer for video editing
-
USB flash drive
Recording 360º Videos
Preparing the Camera
-
Make sure the battery is fully charged.
-
Make sure the SD memory card is properly formatted and has enough free space.
-
Clean the camera lenses with a soft lens cleaning cloth.
-
Set up the camera as follows:
Mode: 360º Video
Resolution: The highest available, starting from 4K.
Framerate: Videos can be recorded at 30 fps, but if you’re capturing a lot of movement, we recommend 60 fps. Depending on the camera model, you might need to lower the resolution, but it should never be below 4K.
Image Stabilization: Enabled (default setting).
Recording a 360º Video
-
Insert the SD memory card into the Insta360 camera.
-
Mount the camera on a support, such as a selfie stick or tripod.
-
Turn on the camera.
-
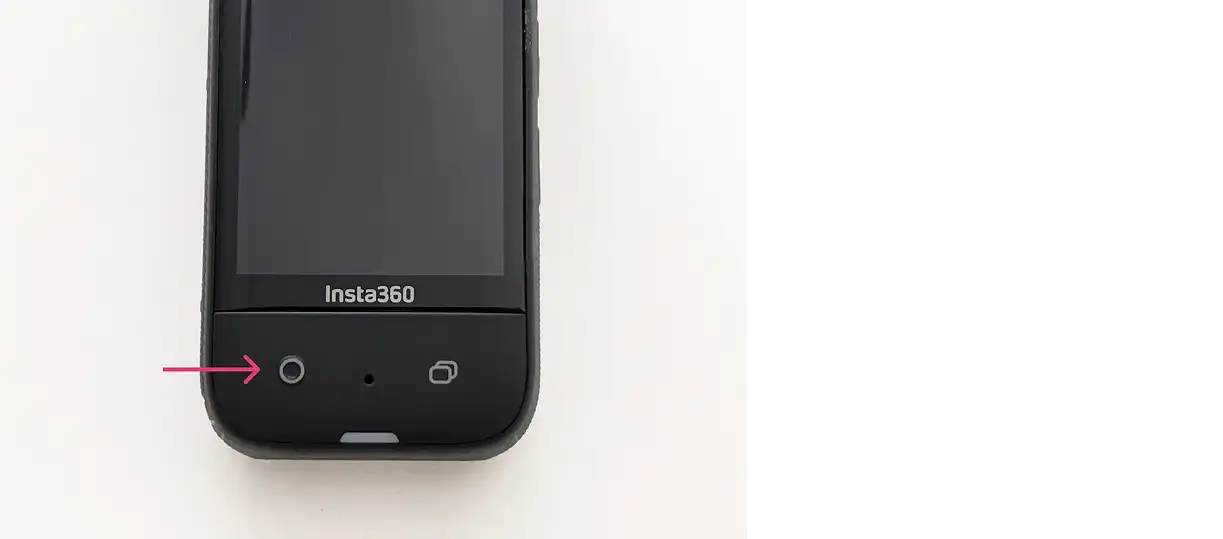
Press the Record button (round icon) to start recording.
-
Press the Record button (round icon) again to stop recording.

Recording Tips
-
360º cameras capture everything around them—make sure to consider all elements in the environment.
-
If you don’t want to appear in the video, you can leave the room or move out of frame after starting the recording, and then trim the beginning and end of the video during editing.
-
Position the camera at eye level whenever possible.
-
If recording while moving, walk at a slow, steady pace to avoid excessive vibrations.
-
Avoid having objects too close to the camera lenses to reduce distortion. Keep a minimum distance of 1 meter from the object or action you want to capture.
Editing 360º Videos
Importing and Editing the Videos
-
Remove the SD memory card from the Insta360 camera.
-
Connect the SD card reader to your computer, or use the built-in reader if available.
-
If desired, back up the raw video files to an external hard drive or a cloud-based service.
-
Download and install Insta360 Studio.
-
Open the program and import the 360º videos.
-
From the top menu, select “Media” (do not select “Project”).
-
Trim the beginning and end of the video, and edit the clips as needed.
-
Apply “Direction Lock” to keep the image level and maintain a consistent viewing direction.
-
Enable “Dynamic Stitching” to prevent cuts or distortions in nearby objects.
-
Apply “Color Plus” at 30–50%, depending on the characteristics of the video.
-
Activate “ND Filter” to smooth movements and reduce vibrations in the footage.
-
Enable “Noise Reduction” to remove unwanted background sounds and improve audio clarity.
-
Adjust brightness, contrast, and other settings as needed based on your preferences and technical skills.
-
In most cases, only minimal image adjustments are required. Avoid over-editing the footage.
Exporting the Edited Videos
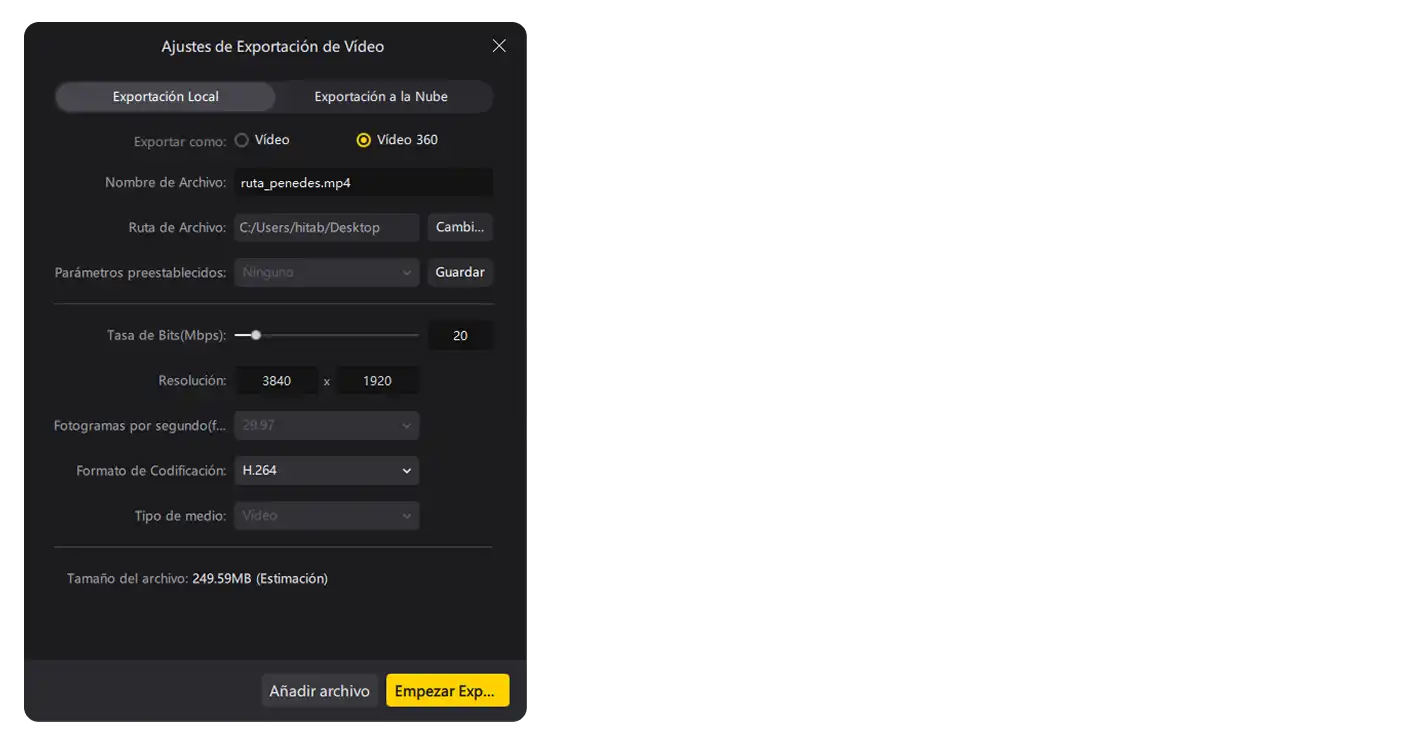
360º Videos: Videos that allow you to rotate the view and see the full 360º scene.
Once you’re satisfied with the results, select “Export”.
-
Choose the file name and destination folder for the export.
-
Enter the following settings:
-
Export as: 360º Video
-
Bitrate: For playback on MK: 20 Mbps. If you plan to do further editing in Adobe Premiere or DaVinci Resolve, use 35 Mbps to avoid quality loss from re-encoding.
-
Resolution: 3840x1920p
-
Encoding Format: H.264
-
-
Click “Start Export” and wait for the export to finish.
-
Repeat the process for any additional videos.

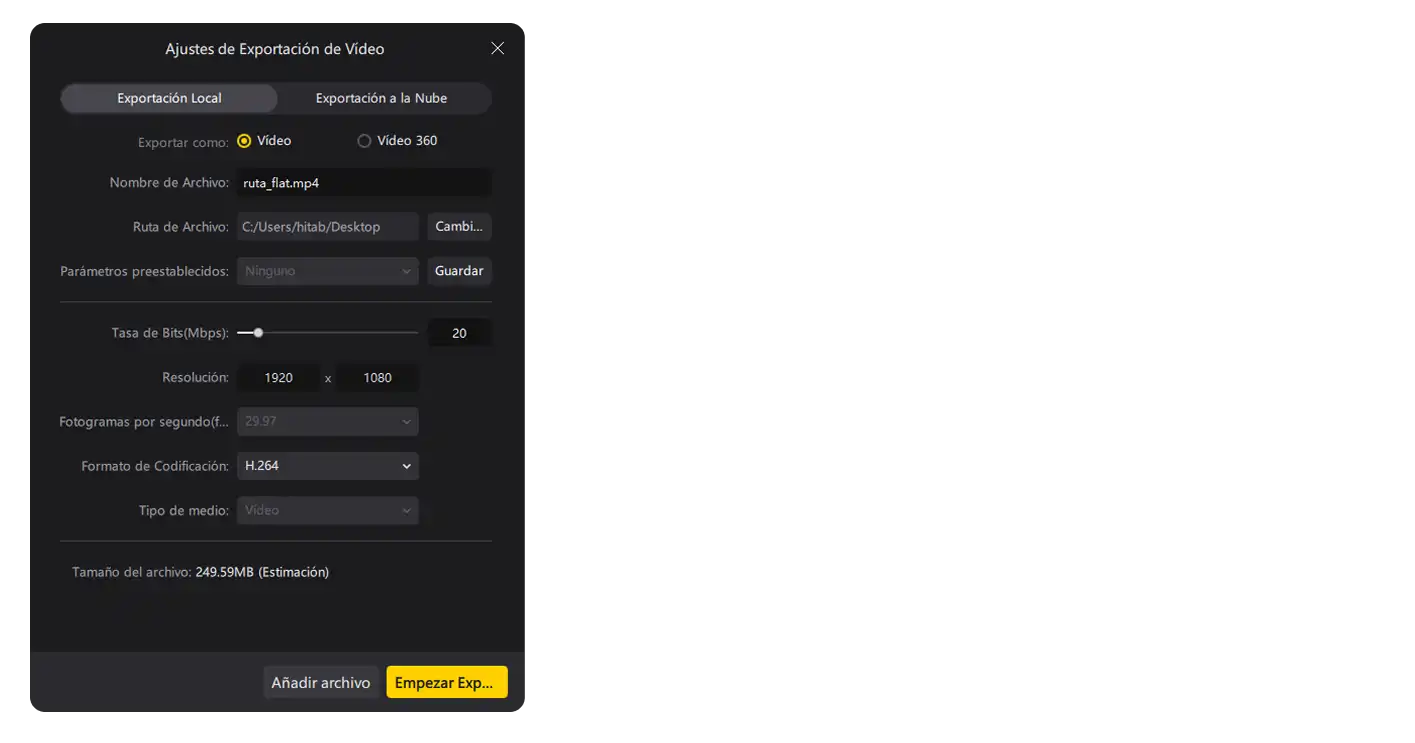
Flat Videos: Videos that do not allow rotation.
Once you’re satisfied with the results, select “Export”.
-
Choose the file name and destination folder for the export.
-
Enter the following settings:
-
Export as: Video
-
Bitrate: For playback on MK: 20 Mbps. If you plan to do further editing in Adobe Premiere or DaVinci Resolve, use 35 Mbps to avoid quality loss from re-encoding.
-
Resolution: 1920x1080p
-
Encoding Format: H.264
-
-
Click “Start Export” and wait for the export to finish.
-
Repeat the process for any additional videos.

Uploading and Viewing 360º Videos
USB Flash Drive
Save the 360º videos to the USB flash drive as follows:
-
Format: ExFAT (compatible with Linux)
-
Save the videos you want to play in the root folder of the USB drive. Avoid adding other files or subfolders.
Viewing 360º Videos
-
Turn on the immersive projector before connecting the USB flash drive.
-
Connect the USB flash drive to any USB port on the CPU of the immersive projector (do not connect it to the projection module).
-
Connect your phone, tablet, or computer to the projector’s WiFi and launch the MXControl interface. (See setup and connection manuals for details.)
-
Once inside MXControl → Select Menu → USB
-
Choose a video to play.
-
After watching, remove the USB flash drive before turning off the projector.

Privacy Statement
Videos are played directly from the USB flash drive and are not downloaded to the projector’s local hard drive. They can only be viewed while the USB flash drive is connected to the projector.
